
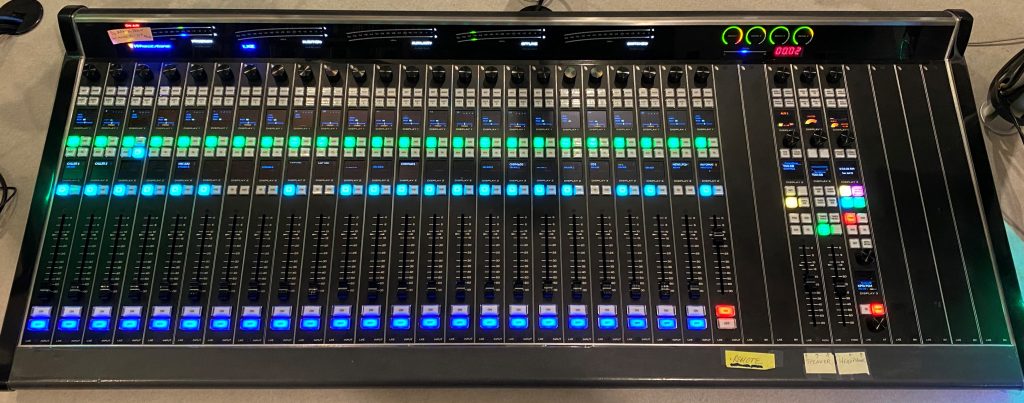
The board is the console that is used for controlling the audio mix and output during a live broadcast or studio recording.
Faders & Main Functions
Just by looking at the board, the most noticeable elements are the faders. Each fader controls a certain audio source that can be turned on, potted up, and broadcasted over the air. Depending on the board’s configuration, each fader will control different audio sources. Normalizing the board to the different configurations (Norm Talk, Norm Music, etc.), you will notice that the assigned audio sources to each fader will change. As you might have noticed, every fader looks the same, so as intimidating as the board as a whole might look, once you’ve learned one fader and its components, you have learned every fader and its functions. So let’s take a look at a single fader and breakdown its components.

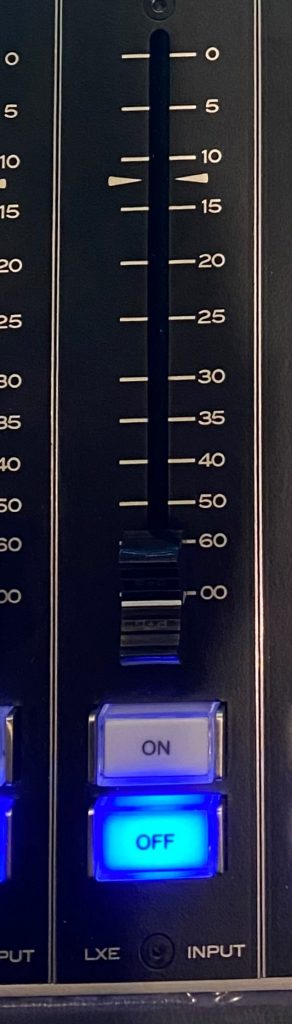
A. The ON button turns this fader or sound source on, OFF turns it off. You must however raise the fader to a desired gain for it to actually go over the air.
NOTE: For most faders, raising the fader from its lowest position will turn the fader on and lowering it completely will turn the fader off.
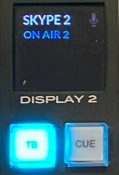 B. TB or talk-back allows you to communicate with a host or guest offline (without going over air). Therefore, faders that are assigned to microphones will have talk-back capabilities, phones will have talk-back capabilities, as well as those faders that are assigned to software that allow for calls such as Skype, IPDTL, Zoom, etc.
Talk-back is used by pressing and holding down the button while talking and depressing it when you’re done. Think of talk-back as an intercom system to speak to the person on the other side of the source. In order to hear the other person, CUE must be activated.
CUE allows you to preview a fader’s audio source offline (without going over air) by putting the source of the fader into the cue speakers (located on top of the board). Say for example a show is currently airing and you are lining up a guest via Skype, you can press the CUE button on the SKYPE fader to listen to the guest and their connection while holding down the talk-back button to communicate with them. As another example, say that you want to cue up an audio piece to an exact moment, CUE allows you to listen to your audio piece through the CUE speakers without the audio going through over the air, allowing you to preview and cue up your sound piece.
NOTE: When the fader is in CUE, the program signal will be turned down so that you are able to hear what you are cueing. Also important to know is that when in CUE and listening through headphones, the headphones hear CUE and not PGM.
The screen display is showing you what that particular fader is assigned to. In this case, this fader is assigned to SKYPE 2.
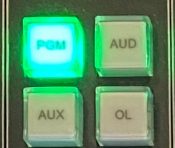 C. These four buttons are called output selectors or output channels.
When the PGM or program button is pressed, that fader’s sound is going to the transmitter for broadcast, or if in production, it is directed to whatever recording software you are using, Soundforge for example.
AUD or audition is used for sending to national broadcasts, allowing us to share with other Pacifica stations but not send them our local call letters / legal ID.
AUX or auxiliary is similar to cue in the sense that it allows you to monitor a source offline, meaning not over the air. When AUX is selected, not only can you hear the source but you can also monitor, check, and set that source’s levels (monitor the AUX meter). As a board operator, one of your duties is to keep all levels relatively the same and the AUX button allows you to do that by checking your levels off air.
OL or offline is the channel that is sent to talk-back and not over air. This is why your local mic is always set to PGM but also to OL. Any source set to OL will be sent to the person on the other end when you hold down talk-back (TB). So for example, say a host wants to make sure that the right piece of audio is going to be played, you can set that piece of audio’s fader to OL, hold down the talk-back button and play the audio for the host to review.
NOTE: For the purposes of using AUX and OL to preview a source, you will want to make sure that PGM is not selected, otherwise whatever you are doing, whether checking levels in AUX or sending something to a host or guest in OL, will be broadcasted and will go over the air.
 For the purpose of board operating, you do not have to worry about the SOFT 1, and SOFT 2 buttons. What is important, however, is the knob directly above the buttons, the SET button, and the MODE button.
The knob allows you to control the gain. The GAIN is used when you want to override the normalized level of a sound source. Sometimes the sound source is really low. Your first option is to bring up that fader, but when you’ve done so and still the sound meters are not peaking into the blue/white light at -20dbfs, you can press down on the knob and turn it to adjust the gain. You will notice that the sound source will get louder as you turn it. Once done with that segment, normalize the board so that the gain will revert to the default level.
NOTE: The gain function will not work for audio sources coming from the computers (PC1, PC2, PROD_PC). You must amplify the audio by raising the volume on the playback program, and/or the computer itself.
Sometimes you may find yourself in need of a source or fader that is not available. Say for example, the board is normalized for public affair shows under NORM TALK but you want to use a turntable to play a certain song. You can always change a fader to control a certain sound source. Find a fader that you will not be using and would like to change its source. By pressing SET you can then turn the knob and navigate through all possible sources. Once you have found the source you’re looking for, Turntable for example, push down on the knob to select it. You now have access to a fader that controls a turntable. Make sure to normalize the board when done if you’ve made any changes.
The MODE button changes the fader from mono, to stereo, to right channel, to left channel, and to surround. This may come in handy if for some reason an audio file is recorded and it only comes in through either just the right or left channel. This can cause the silence detector – detecting that one channel has no audio coming in – to kick in. In that case, you will want to press the mode button and select mono. Please leave it in either stereo or mono.
The display below the buttons shows what the fader has been set to: stereo, mono, or panned to the left or right.
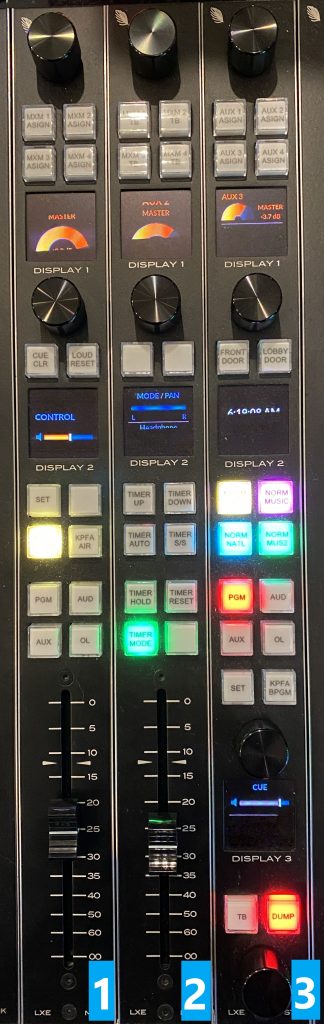
On the right side of the board are a lot of bells and whistles, many of which we do not have to worry about. For the purpose of board operating we only need to know a few of these functions. As you can see, there are three areas to focus on.
Area 1 controls what you hear through the control room speakers. The fader brings the volume up or down depending on your preference. Currently selected is KPFA BPGM which is what is going on live, prior to the delay, however you can choose to listen to exactly what the listener
hears after the delay by switching to KPFA AIR. Like we mentioned before, you can also select PGM to listen to what you are sending out to the transmitter (what is going on on the board). You can select AUX to listen to any sound source that has been set to AUX (this can be used to test sound, set levels or send audio to an in-studio host. Likewise, you can select AUD to listen to any sound source that has been set to AUD, or select OL to listen to any sound source that has been set to OL.
NOTE: This fader is simply controlling the volume of the speakers in the studio and does not affect the gain of what is being broadcasted over the air.
Area 2 is where the fader that controls the volume for the headphones is located.
Area 3 controls what is being sent to the talent studio or booth. You can select what they listen to in their headphones. As you can see, PGM is selected and therefore the talent in the studio or booth are listening to any source or fader that is set to PGM.
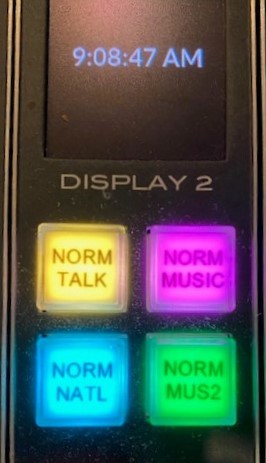
Also in this area, you have the board NORMALIZATION buttons. These buttons normalize the board to certain layouts or configurations. NORM TALK will set the board to be used for public affair shows such as daytime talk shows like UpFront. There are two NORM MUSIC buttons that are used to set the board for music shows (two different configurations or layouts). NORM NATL will set the board to be used during shows that are broadcasted nationally.
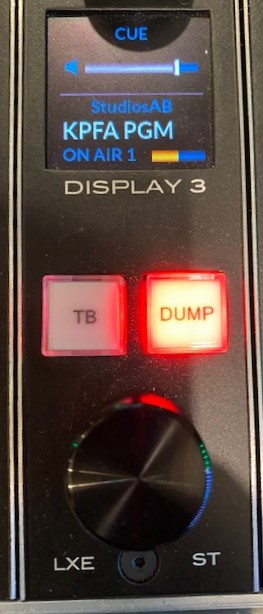
Here you also have a knob labeled CUE that controls the volume for the cue speakers.
There is also a TB or talk-back button that will allow you to talk to every headset in the talent studio or booth, meaning everyone will hear what you are relaying. To talk to someone individually, use the TB button on that microphone’s designated fader.
As you can see, this is also where the Dump button is located. The dump button is used when foul language is used and needs to be edited out or “dumped.” For more information on the dump button please refer to the Indecent Language Over Air/Dump Button section.
Meters

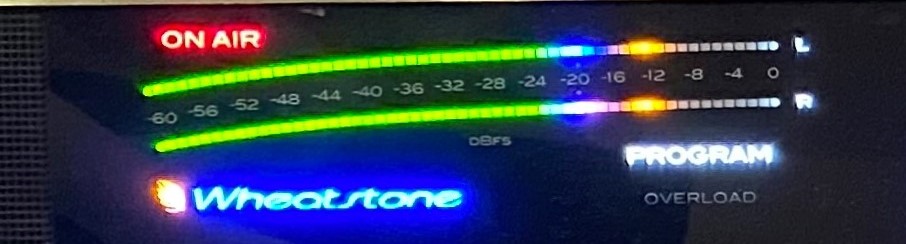
The levels are shown by the longer bar on the left. This is your VU meter and you should be aiming to keep hitting the blue marks at -20db. If this bar goes below -40db, “silence/ low noise” detection will trigger and take over after 20 seconds if the low gain is not corrected
The shorter bar on the right is the transient peak high point. This can push into the red, and even stay in the red for extended periods of time so long as the “OVERLOAD” warning does not come on. For 99% of all cases in the station, we can essentially ignore transient peaks. Focus your attention on the bar on the left, making sure it is constantly hitting the blue marks at -20db.
The markings above and below the meter show the db level. you have 40db of range, this is enough to boost into highs and get quite into the lows.
Again, going below -40db will result in silence detection taking over and likely an evergreen of the show or generic, backup copyright-free music will kick in.
Going above 0db will show yellow, then red, warning you are approaching an overload, if overloaded the sound becomes distorted and sounds “blown out,” though you will stay on air.
There are 5 meters on the ON AIR board:
PROGRAM – This monitors what is being sent to air.
AUDITION – This monitors what is being sent to the audition channel which is used for national broadcasts.
AUXILIARY- This shows what is being sent to the aux channel, feel free to use this channel for testing levels or listening to a source even if a national broadcast is going on.
OFFLINE – This monitors what is being sent to off site talk-back (it is always listening to the local mic).
SWITCHED – This monitors the combined levels of everything in cue.